Filling a beanbag can be fun, and it doesn't have to be time-consuming if you follow these simple steps.
Introduction to Bean Bags
Bean bags have become a staple in modern homes, loved for their versatility, comfort, and playful style. Unlike traditional furniture, bean bags conform to your body, making them ideal for relaxing, reading, or gaming. They’re especially popular with kids, but adults appreciate their ergonomic support and the way they add a casual vibe to any room.
The secret to a great bean bag lies in its filling and construction. Most bean bags utilise an inner bag or liner to contain the bean bag filling, typically lightweight EPS beads, soft foam, or a combination of both. This inner liner is then placed inside a durable outer cover, which comes in a variety of colours and fabrics to match your décor. When shopping for bean bags, pay attention to the quality of the filling, the strength of the seams, and the feel of the outer cover. A well-made bean bag will retain its shape, offer lasting comfort, and withstand everyday use, making it a fun and functional piece of furniture for the whole family.
How to Fill a Bean Bag in 5 Minutes
You can fill a bean bag in 5 minutes with the right tools and technique. If you’ve ever wondered how to fill a bean bag with minimal fuss and mess, this guide is for you.
Here’s what you need:
-
Bean bag cover
-
Filling (beans, foam, or pellets)
-
Large funnel or scoop
-
Duct tape (optional)
-
A friend (grab someone to help you with the filling process)
Step-by-step process:
-
Set up your workspace in a clean, open area.
-
Place the bean bag cover on the floor and unzip it.
-
Insert the funnel into the opening.
-
Start pouring the filling slowly and carefully into the bean bag, using the funnel to avoid spills.
-
Once filled, zip up the cover and sit on the bean bag to test its firmness. Decide if you need to add more filling to achieve your desired comfort level—it's easier to add more than to remove excess.
What You'll Need:
-
Bean bag filler (300-500L from K-Mart, Target, Big-W)
-
Wide funnel or makeshift funnel (rolled paper/cardboard)
-
Scissors (if needed to open filler bags)
Step-by-Step Process:
-
Locate the inner zipper - Find the childproof safety zipper on the inner liner
-
Open carefully - Unzip slowly to prevent spilling beads
-
Insert funnel - Place a wide-mouth funnel or rolled paper into the opening
-
Add filling gradually - Pour 2-3 cups at a time to avoid overflow
-
Test firmness - Sit on the bean bag and adjust filling as needed
-
Seal securely - Ensure the zipper is completely closed for safety
Time required: 5 minutes for standard bean bag. Filling amount: 300L for 96cm, 400L for 104cm, 500L for 112cm Coco Cotton bean bags
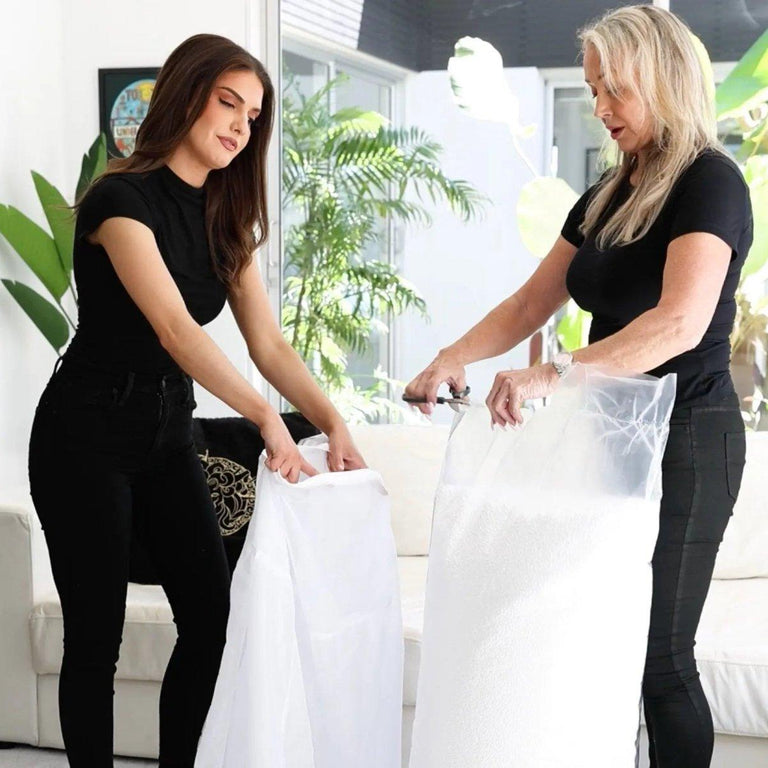
Filling your bean bag does not have to take hours. If you've ever wondered how to fill a bean bag with minimal fuss and mess, this guide is for you. Filling a beanbag can be fun and efficient if you follow these simple steps. Always have two people on hand, as doing it solo is quite tricky. Ensure you're indoors in a space free from wind or breeze. Turn off any fans or air conditioners to prevent the lightweight beads from scattering. It is best to fill your bean bag in a corner or bathtub to contain any spillage. Keep children, pets, and babies out of the room, as the beads can pose a suffocation risk if ingested.
How to Fill a Bean Bag
Prepare your workspace
Ensure that when you purchase a bean bag cover, you buy one with an inner liner. An inner liner not only makes filling easier, but it also allows you to change outer covers as required. Inner liners make cleaning the outer cover easier, as you can remove the inner bag once filled and place the outer cover in a washing machine or tub, provided the material is washable. Bean bag coverings often have zippers designed without pullers to prevent children from accidentally opening them. Bean bags are made with safety zippers that require a safety trigger to be opened, preventing children and pets from accessing the filling inside. Ensure the area where you will fill your product is clean. Use a tiled floor or one covered in linoleum or timber. So if you do spill any of the beads, they are easily vacuumed. Use a vacuum cleaner to clean the floor and ensure the ground is free from dirt, dust or lint before starting.
Make a funnel
Make a funnel can from a plastic waste paper bin or a plastic bucket. The type that you buy from a reject shop or a ‘two-dollar’ shop will usually suffice. Use a Stanley knife, box cutting knife or hacksaw blade to remove the smaller end of the bin or bucket. Removing the closed end will create a funnel, allowing you to pour the bean bag filling quickly. If you are using rolled paper or cardboard to make a funnel, wrap the material around itself to reinforce the funnel and prevent leaks during filling. Using a paper clip or corn cob holder, undo the safety zipper on the inner liner bag. Insert the funnel into the hole and secure it with the zipper around the funnel.
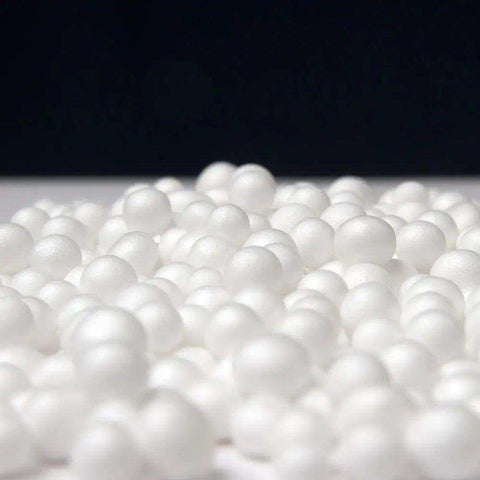
bean bag filling
You can purchase Bean Bag filling in 100-litre bags at major department stores such as K-Mart, Big W and Target. There are a variety of bean filling options available, including traditional beans, micro-beads, foam, and custom blends, each suitable for different indoor or outdoor uses. Click Here for a list of beanbag filling retailers in Australia.
While one person is holding the funnel, the other person can cut open the bag of filling. Don’t cut across the corner at 45 degrees. Instead, cut along the end of the bag, about 150mm, or half the width of the bag. Cutting the corner of the filling bag can prevent excessive spillage during filling. Discard the piece of the plastic bag that you have cut off. Now, gradually pour the contents into the funnel. To control the beans' flow and avoid spills, pour slowly and use a steady hand to ensure the beans move smoothly into the bag.
You will be able to gauge how quickly to pour, ensuring that everything goes into the bag and not on the floor. Ensure that all the beans are placed inside the bag to prevent waste and mess.
Do not overfill your bean bag. Overfilling the bean bag makes it less comfortable and places undue stress on the stitching and zipper. Remember, this little bean bag may be holding over 100 kilograms of weight when an adult sits on it, and that places enormous pressure on the seams. As a general rule, try to fill the bean bag to around two-thirds of its maximum capacity. It is easier to add filling than it is to remove it. Traditional bean bags may require refills over time as the filling compresses or shifts.
Once you have filled the inner bag with the required amount of filling, remove the funnel and do up the zipper. Shake the bean bag to distribute the filling throughout the bag for optimal comfort evenly. Now you can place the filled inner bag into the bean bag cover.
Parents are advised to store leftover bean bag filling in a place where children or pets cannot access it, as it can pose a safety risk.
Note: Always fill your bean bag in a well-ventilated area and keep the filling away from open flames or heat sources.
Using a Bean Bag Cover
A bean bag cover does more than add a splash of colour to your space—it’s essential for protecting the inner bag and the bean bag filling inside. Most covers are crafted from durable, washable materials like cotton or polyester, designed to withstand spills, stains, and everyday wear. For easy maintenance, look for a bean bag cover with a zipper or plug, so you can quickly remove it for washing or refilling.
Following the care instructions from the manufacturer will help your cover stay fresh and vibrant, even after repeated washes. If your bean bag gets a lot of use, especially from kids or pets, choosing a washable cover is a smart move. By keeping the cover clean and in good condition, you’ll extend the life of your bean bag and keep it looking as inviting as the day you bought it.
cleaning up
To clean up any spilled beans, use a vacuum cleaner. A bag-less vacuum cleaner, like a Dyson, will allow you to reuse any beads from the floor. Ensure that all loose beans are removed from your floor surface, as they can be hazardous to humans and pets if ingested. Clean up spilled bean bag filling immediately to prevent accidents. Filling your new bean bag does not have to be time-consuming or messy. If you follow these easy steps, it will take just a few minutes, and there should be little or no mess. Please dispose of the plastic bags that your products and filling came in thoughtfully. We suggest placing them all in one bag and putting them in your recycling bin. Remember, these bags can be dangerous if children get their hands on them, so dispose of them immediately after use. Buying bean bag covers and filling them yourself will save you a tremendous amount of money, as pre-filled bean bags are considerably more expensive to freight than covers only.
Tips for Working with Foam Filling
Foam filling is a great option for those seeking a softer, more supportive bean bag experience. If you’re filling your bean bag with foam, start by selecting a high-quality foam designed specifically for bean bags—this ensures durability and comfort. When it’s time to fill, use a funnel or similar tool to pour the foam filling into the inner bag gradually. This helps control the flow and minimises the mess.
Adjust the amount of foam to suit your comfort—some people like a plush, sink-in feel, while others prefer a firmer seat. If convenience is a priority, consider a pre-filled bean bag or one with a built-in foam filling system, which can save time and reduce hassle. By following these simple steps, you’ll create a cozy, supportive spot that’s perfect for relaxing, reading, or just kicking back after a long day.
Bean Bag Filling FAQ
How much filling do I need for my bean bag?
Filling amounts vary by size: 96cm bean bags require 300L, 104cm require 400L, and 112cm require 500L of filling. You can buy filling from K-Mart, Target, Big-W, Walmart, or Amazon.
What type of filling is best?
Virgin EPS beads are best for bean bags. Avoid recycled beads, as they compress more quickly and don’t provide the same comfort and support. The best type of filling for bean bags is virgin EPS beads, as recycled beads compress faster and provide less support, making them less durable over time.
Foam-filled bean bags are also a great option, as they are comfortable, durable, and can even serve as dog beds for your pets. Foam-filled bean bags are convenient because they require less maintenance compared to traditional bead fillings. With foam filling, you don’t have to worry about frequent refills or accidental spills, making them a practical and reliable choice.
How often should I refill my bean bag?
Refill every 12-18 months or when your bean bag feels flat. Normal compression occurs with regular use, so if your bean bag starts to feel flat, it can be a result of everyday use and is easily fixed by adding more filling. Refill bean bags every 12-18 months to maintain comfort and support, ensuring they remain as comfortable as when first filled.
Can I wash bean bag filling?
No, don't wash EPS beads. Instead, wash the removable cover separately and replace old filling with fresh beads if needed.